
CDL Driver: Tools You Need to Carry
Doing It Wrong
I once had to spend the night in my truck—at a place where there were no services, no water, and no sanitary facilities. Despite my best intentions, I was unprepared. Instead of the shovel and roll of toilet paper every Boy Scout should always travel with, I used half of a cardboard box to dig a hole, and paper napkins from a fast food restaurant. Not the best solution, but it worked.
I was not prepared.
During Training
Right out of school, your first driving company will probably pair you with an experienced driver (“driver trainer”) to show you the ropes and help you for the first 4–8 weeks. The driver instructor will have tools for you to use. After training, you will be expected to gather your own tools. Most of these tools you probably already have, or they can be purchased for $80–$100.
Tools:
As a professional driver, there are the basic tools you need to carry:
- a heavy duffle bag to hold your tools.
- hammer—any sort of hammer that feels comfortable in your hand will work. I carry a heavy hammer, because it is the hammer that I had at home when I first started driving. I carry a 20 oz. framing hammer (or “rip-claw” hammer) with a steel handle. Instead of a curved claw (which is designed for removing nails), a rip-claw is almost straight, which makes it handy to hack wood or chop ice. (I’ve used it to chop a lot of ice over the years.) It’s also handy for removing nails from the floor of the trailer.
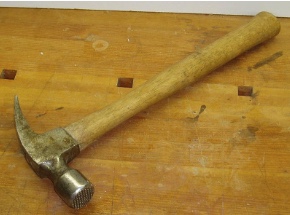
framing hammer
Retrieved from: https://en.wikipedia.org/wiki/Framing_hammer#/media/File:Framing_hammer.jpg
- mallet—2 pound rubber (headed) mallet. It’s useful for freeing stuck or frozen metal parts on the sliding tandems of a trailer. Never strike the trailer with a steel hammer, you could break something.
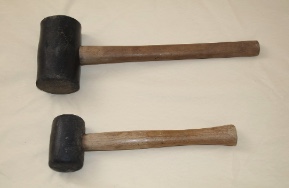
rubber mallet
Retrieved from: https://en.wikipedia.org/wiki/Mallet#/media/File:Rubber_mallets.jpg
- 50–foot tape measure—very handy for verifying the distance between the 5th wheel and the wheels on the trailer (a maximum of 40’ in California)—or, you can use a 25’ tape measure and measure twice.
- a variety of screwdrivers and sockets—I have a cheap, plastic tool kit with 200–300 cheap tools. Two decades ago, I paid $20 for it—on clearance. It is amazing how often you will need a strange, non-standard tool; usually in the middle of the night, in the rain. Once—late at night, in the middle of a snow storm—I needed a #6 Torx (T6). I found it in the bottom of my cheap little kit. I fixed the tractor, and got back on the road.
- dust pan and brush—to clean up the huge amount of dirt and dust your boots will track into your tractor.
- small crowbar (optional)
- a couple of padlocks (optional)
Acquiring the Tools
Don’t feel the need to go on a major shopping spree and get all of this in one swoop. You can gradually add to your tools as you find good deals. Late one night at a truck stop, I found a cheap tool kit at one-fourth the original price because I waited until it went on sale.
So, in summary, be aware of the tools you really need, look for good deals, and be patient.
Keep Reading

Commercial Driver's License Test Blog
How Many Questions are on the CDL Permit Test?
Embarking on a career in commercial truck driving begins with a crucial…

Commercial Driver's License Test Blog
What are the Three Tests for the CDL Permit?
If you’re looking to embark on a career in truck driving, obtaining a C…

Commercial Driver's License Test Blog
How Much Does It Cost to Get a CDL?
The trucking industry dominates freight shipping. Trucks handle over 70…